Published
- 7 min read
Python Environment Management

The above figure is generated by DALL·E 3 with prompt: Photo of a computer screen displaying Python code with conda and venv commands highlighted. Stickers related to Python and environment management are visible on the laptop’s exterior.
What is a Python Environment
Python is a cross-platform object-oriented scripting language that can run on platforms such as Windows, Linux, and Mac OS. A Python environment is a folder that contains the Python interpreter and all necessary libraries.
Why Manage Python Environments?
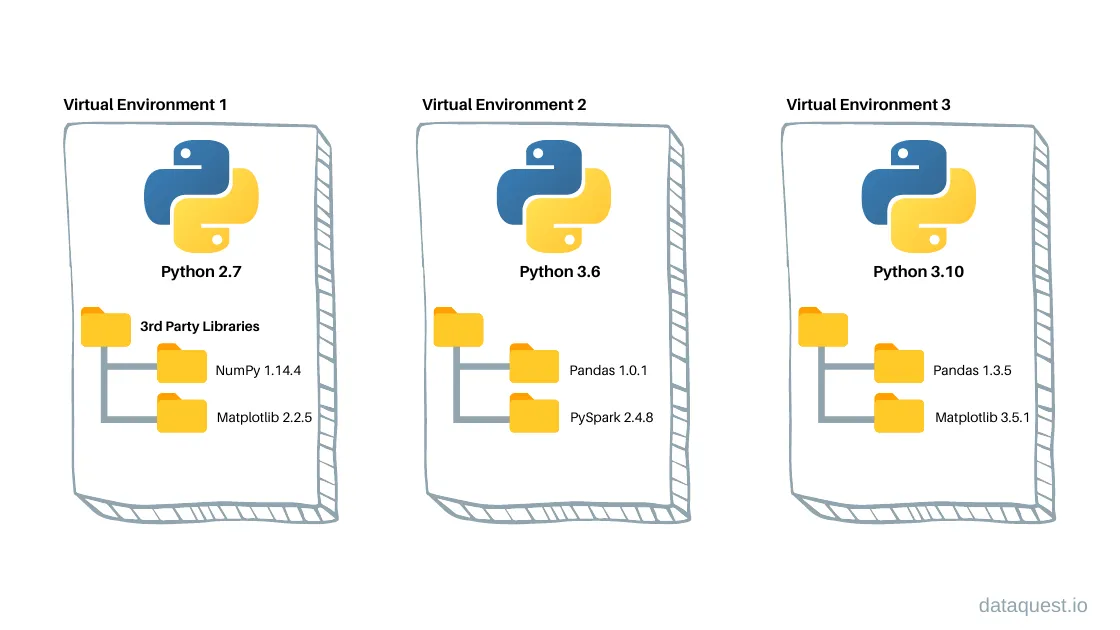
Different projects may require different Python versions and libraries, and Python libraries may also depend on each other, with specific version requirements. If all projects use the same Python environment, the environment will become messy and difficult to maintain when there are many projects. For example, project A requires Python 3.6 and Pandas 1.0.1, and project B requires Python 3.10 and Pandas 1.3.5. Although Python interpreters and many Python libraries are backward compatible with themselves, lower versions of Python may not support higher versions of third-party libraries. Therefore, we need to separate the Python environments of these projects so that each project can run independently. The following image (from dataquest.io) shows a simple example of a virtual Python environment: three Python environments are independent of each other and do not affect each other. When one of the Python environments is operated on (such as installing or deleting a library, upgrading a library version), the other two Python environments will not be affected.
Python Environment Management Tools
Python environment management tools include:
-
conda: An open-source tool developed by
Anacondacompany. This tool is included in its productsAnacondaandMiniconda(both are Python distributions). -
venv: A library included in Python 3.3 and above, used to create virtual Python environments.
Either of these two tools can be chosen, but I prefer to use conda for version and package management.
conda
To use conda, you first need to install Anaconda or Miniconda. The difference between the two is that Anaconda is a complete environment that includes the Python interpreter and all commonly used third-party libraries (such as commonly used numpy, pandas, matplotlib, etc.), while Miniconda only includes the Python interpreter and does not include any third-party libraries. This can save disk space, and it also comes with conda, which allows you to install environments and packages according to your needs. For novice users, it is recommended to install Anaconda.
Anaconda download link: https://www.anaconda.com/download/
Miniconda download link: https://docs.conda.io/en/latest/miniconda.html
Simply select the installation package corresponding to the operating system. It is recommended to install the 64-bit version. After installation, when you open a command prompt window, a default environment called base will be automatically launched. This environment is the default environment of Anaconda or Miniconda. If you don’t want base to be automatically launched every time, you can run the following command in the command prompt window:
conda config --set auto_activate_base false
View all conda environments:
conda env list
After running the above command, all conda environments will be displayed. If you haven’t created an environment yet, only the base environment will be displayed.
Create a new environment:
conda create -n my_env
my_env is the name of the environment, which can be arbitrarily specified. If you want to create a new environment and specify the Python version, you can do it like this:
conda create -n my_env python=3.10
The above command will create an environment named my_env and install Python 3.10 in the environment. Activate the environment just created:
conda activate my_env
If this environment will no longer be used, you can completely delete the environment with the following command:
conda remove --name my_env --all
The above commands can be used for basic environment management. For more environment management commands, please refer to conda’s official environment management documentation.
In addition to environment management, conda can also perform package management. Package management refers to the installation, upgrade, deletion, etc. of packages. To install a package with conda, you can run:
conda install -c conda-forge numpy
The above command will install the numpy package in the current environment. -c conda-forge indicates downloading from conda’s official repository, and conda-forge is the name of conda’s official repository.
Note: Before installing packages with conda, switch to the environment first. For example, if you want to install the numpy package in the my_env environment, you need to run
conda activate my_env
to activate the my_env environment, and then run the above command to install the numpy package in the my_env environment.
conda’s abilities of managing environment is not limited to Python. You can also create environments for other languages, such as NCAR Command Language (NCL), R, etc. For example, to create an environment for NCL, you can run:
conda create -n ncl_stable -c conda-forge ncl
This will create an environment named ncl_stable and install the ncl package in the environment. To activate the environment, run:
conda activate ncl_stable
This is all you need to do to install NCL with conda (so convenient!). Using conda to install NCL is also the recommended way by the NCL official website. For more information, please refer to the NCL installation documentation.
For more package management commands, please refer to conda’s official package management documentation.
venv
venv is a library that comes with Python, so if you have already installed the Python interpreter, you can use venv directly. venv stands for virtual environment, and it can create and manage virtual environments, which do not affect each other.
To create a virtual environment:
       cd ~
mkdir my_project
python3 -m venv my_project/my_env
The first step cd ~ switches to the home directory (~ represents the home directory), but you can also switch to another directory depending on where you want to store your project. The second step mkdir my_project creates a folder. The third step python3 -m venv my_project/my_env creates a virtual environment, and the root directory of the virtual environment is my_project/my_env. Note: my_project and my_env are the names given to the project directory and virtual environment directory, and you can change these two directory names.
After creating the virtual environment, activate it:
source my_project/my_env/bin/activate
If you run
which python
You will see the path of the Python interpreter in your virtual environment. In this example, the path is ~/my_project/my_env/bin/python.
To exit the virtual environment, run:
deactivate
To completely delete the virtual environment, run after deactivating:
rm -rf my_project/my_env
Delete all files in the virtual environment.
To manage packages in the venv virtual environment, you can only use the pip command. First, upgrade pip to the latest version:
python3 -m pip install --upgrade pip
Then run the following command, for example, to install the numpy package:
python3 -m pip install numpy
Note: You need to activate the virtual environment first to install the numpy package in the virtual environment. For more information on using pip, please refer to the pip user guide.
If you want to learn more about using virtual environments, you can refer to the venv section of the Python official documentation and the second reference in this article.
Summary
This article introduces two commonly used Python environment management tools, conda and venv, and you can use either one. Personally, I prefer to use conda because it is simple and convenient, and conda can also manage packages. The advantage of venv is that it is included with Python and does not require the installation of Anaconda or Miniconda.
Python environment management is a necessary skill for Python developers. Isolating different Python environments allows different projects to not interfere with each other and can be better maintained.
References
In addition to the links mentioned in the article, other references are as follows:
- https://stackoverflow.com/questions/54429210/how-do-i-prevent-conda-from-activating-the-base-environment-by-default
- https://www.dataquest.io/blog/a-complete-guide-to-python-virtual-environments/
Notes
This blog is originally written in Chinese. The English version is translated by ChatGPT.